Browsed by
Tag: creative

Halloween : Top 5 Craft Ideas For Kids!

Halloween : Top 5 Craft Ideas For Kids!

Get crafty on Halloween with your little ones! Halloween is the perfect time to get your creative juices flowing. Create, fold, wrap, paint and go crazy! Little kids absolutely love crafting new things. You can take it up a notch by setting a Halloween theme to your crafting activities. Pumpkin shaped lights, skeletons, spooky wall hangings – the ideas are endless! If you’re looking for some fun and innovative craft activities to do with your children, here are the top 5 Halloween craft ideas that you can easily do!
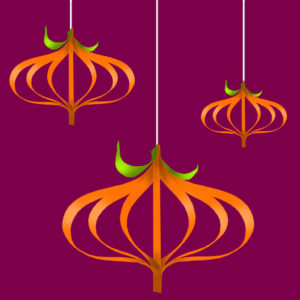
1. Paper pumpkins

  • Take an ice-cream stick and paint it orange.
  • Cut 6 vertical strips (carefully!) from an orange craft paper. Every vertical strip should have one more strip of the same exact length.
  • Make sure that the length of the strips is more than the length of the ice-cream stick.
  • Stick the ends of the strips to the ends of the ice cream stick.
  • Cut two small green strips for the stem and bend them upwards.
  • Hang the pumpkin with a thread!
  • That’s it! Hang a few pumpkins of different sizes to get crafty this Halloween!

halloween-2016

2. Paper plate bats

  • Trace a bat wing template onto your black paper using a pen or pencil.
  • Then flip the wing template over and trace it again.
  • Cut out the bat wings.
  • Using tape, attach the bat wings onto the paper plate.
  • Using the glue stick, attach googly eyes to the front of your bat and draw on a small mouth with a white paint pen.

3. Puffy cotton ghost

  • Start by cutting out a ghost template.
  • Glue cotton balls on it until the ghost is completely covered.
  • Cut out some eyes and a mouth (make it a smile so the ghost looks friendly, not spooky!)
  • Glue those on as well.
  • If you want, you can add a string to the back and hang your ghosts up somewhere in your house.

halloween-2016-ghost


4. Balloon spider web

  • Blow a balloon. Tie a knot and attach a yarn thread around the knot.
  • Mix glue and water in a bowl. Add threads of yarn into the mixture.
  • Wrap the threads around the surface of the balloon in a random fashion. (Don’t wrap it entirely!)
  • After 5 mins, deflate the balloon and securely remove it out.
  • Stick some plastic spiders over the web! And there you go! The balloon spider web is ready!

5. Cotton swab (Q-tips) skeleton

  • Freehand draw some skulls on your white paper or print some off of online clip art.
  • Cut out a skull and glue it on the top of your paper. You will build your skeleton under this.
  • Stick the ‘ribs’ first and then glue the spine over the top. Use a dot of glue on each end of the Q-Tip.
  • Cut Q-Tips as needed for your skeleton’s fingers and feet.

halloween-2016-craft

Image Credits: Alexas_Fotos

5 Easy Art Projects For Toddlers!

5 Easy Art Projects For Toddlers!

Every child is an artist. The problem is how to remain an artist once we grow up.                       ~ Pablo Picasso

Children can be very artistic and very messy at the same time. Creating art can enable them to explore various materials, colors etc. and think creatively at an early age. Toddler activities are slightly difficult to do because they are still learning and growing. In order to enhance their fine motor skills, you can introduce some simple art activities so that your little one is engrossed and entertained for at least a few hours!

As a parent, you must remember that your toddler has a short attention span and he might not even complete the art project. That is totally fine! Make it interesting for your child by avoiding repetition and by introducing new things every time.

To help you do that, we have 5 simple and easy art projects that any toddler can successfully do!

1. Painting over a stencil

  • First, spread a newspaper on the area which might get messy.
  • Find a large sheet of white paper and put it on the table or on the floor.
  • Place a stencil sheet which has simple cut-outs to paint over.
  • Give your toddler a big brush to dip in homemade edible paint just in case your toddler decides to eat it too. Here’s one way to make edible paint.
  • That’s it! Let your toddler paint to his heart’s content!

stencil-art

2. Sponge painting

  • Sponge painting can be super exciting for little kids.
  • Cut out different colors of sponges in various shapes (such as a smiley face, heart, leaf, star etc.)
  • Let your toddler dip one side of these sponges in edible paint and stamp it on a fresh white sheet of paper or plain cloth.

3. Fingerprint, Handprint & Footprint art

  • For this art project, you can draw a tree trunk with branches on a paper with a black marker.
  • Once that dries, ask your child to dip her fingertips in edible paint and stamp it on the branches to imitate leaves.
  • You can also get your toddler to make fingerprints, handprints and footprints on the paper. After it dries, you can draw funny shapes and smileys on those prints together!
  • This makes for a beautiful piece of artwork worthy of being framed!

finger-painting-at

4. Vegetable printing

  • Slice a few firm vegetables like carrots, potatoes, celery stalks, okra in different ways and allow your toddler to dip their ends in the paint.
  • This will create beautiful prints which look like flowers!
  • Finish off the artwork by painting the stems of the flowers yourself.
  • Ta-da! Now you have a joint effort by you and your little one!

5. Spray bottle art

  • Spray bottles can be an object of intrigue for toddlers and they won’t stop playing with it!
  • To make spray bottle art, fill a spray bottle with edible or non-toxic colors mixed with a little water.
  • Keep a towel on the floor that can absorb the paint that will drip down.
  • Place a large paper on a stand.
  • That’s pretty much it. The next step is to let your child spray the watery paint on the paper and create his very own abstract art!

toddler_art

art-toddlers

Image Credits: Yuri_B, Icr3cr, ambush000, MowcowMoms